Clip Frame Measurement Guide
The clip frame measurement mode is used to measure fitting parameters for clip frame glasses. This guide provides a detailed explanation of the measurement process and key considerations.
Measurement Process


1. Measurement Preparation
- Ensure the measurement environment has adequate lighting.
- Adjust the height and angle of the measurement frame.
- Ensure the customer's face is directly facing the camera.
- Check that the camera focus is clear.
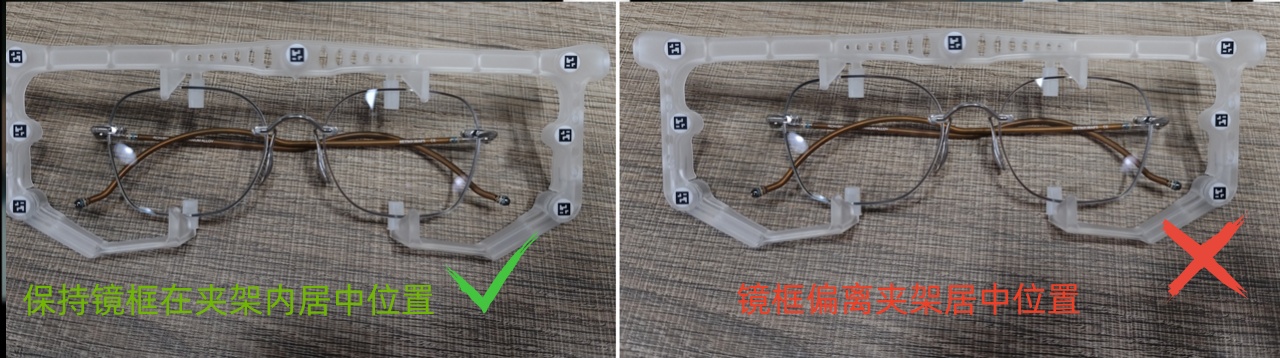
- Ensure the clip frame is correctly and securely installed.
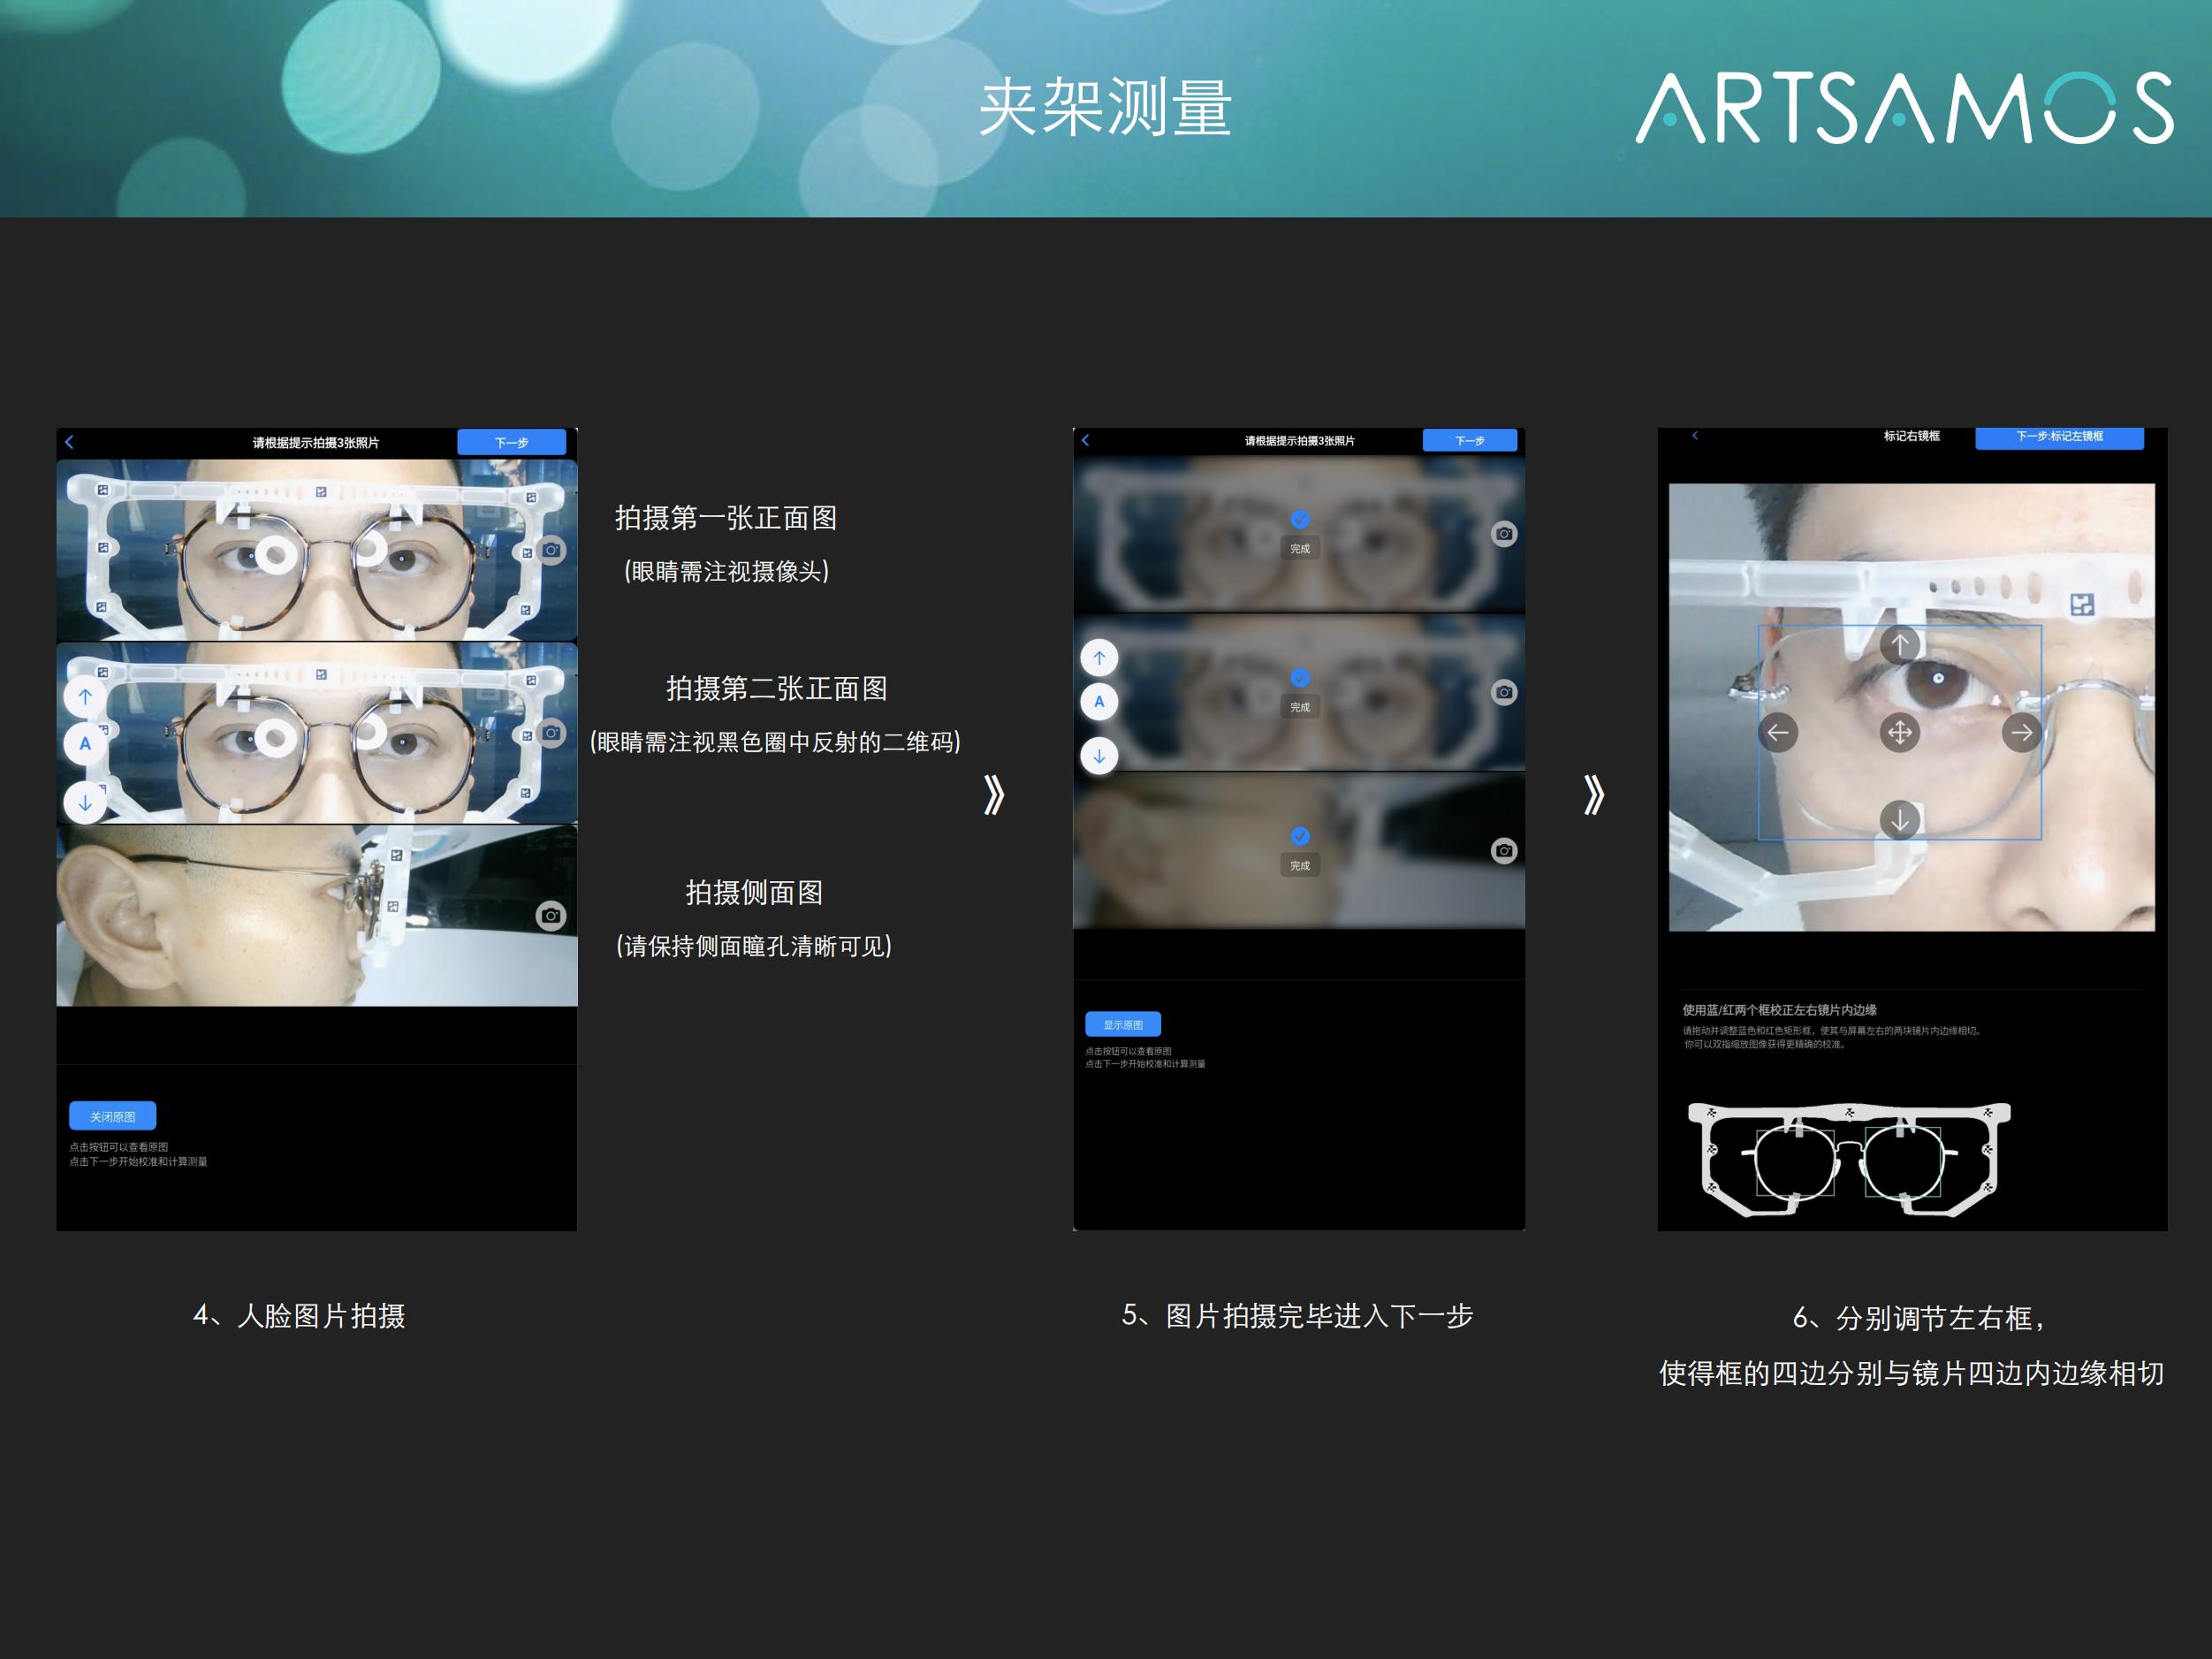
2. Photo Capture
The system requires the following photos to be taken:
Frontal Photos (2 Photos)
- First Photo: Used to measure parameters such as pupil distance and pupil height.
- Second Photo: Used to verify the measurement results.
Side Photo (1 Photo)
- Right-side photo: Used to measure parameters such as forward tilt angle and frame curvature.
- Ensure the ear root position is clearly visible.
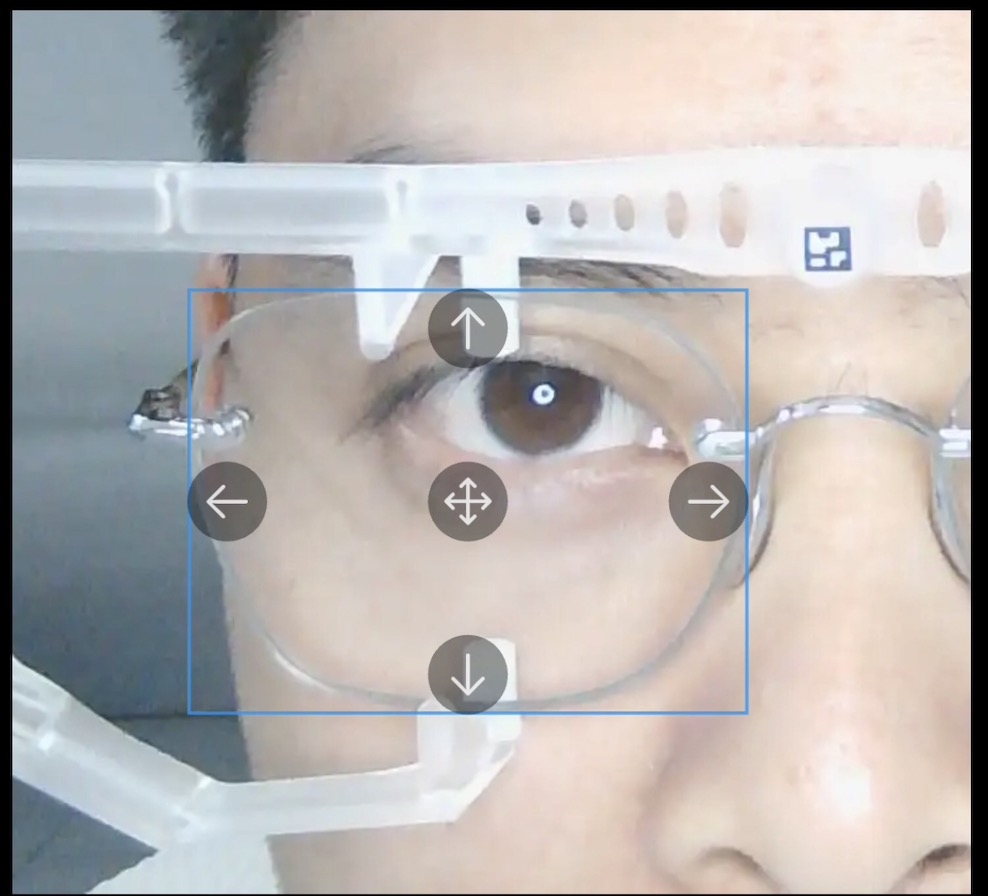
3. Coordinate Calibration
Frontal Photo Calibration
- The system automatically identifies pupil positions.
- Verify the accuracy of the recognition results.
- Mark the clip frame position.
Side Photo Calibration
- Mark the pupil cornea position.
- Mark the inner tangent line position of the clip frame.
- Mark the angle of the clip frame.
4. Parameter Calculation
The system automatically calculates the following parameters: - Pupil Distance (PD) - Near Pupil Distance (30cm) - Pupil Height - Lens-Eye Distance (BVD) - Forward Tilt Angle - Frame Curvature - Face Width - Nose Bridge Width - Frame A Value - Frame B Value
Notes
- Measurement Environment
- Maintain even lighting in the environment.
- Avoid direct strong light.
- Ensure a simple background.
-
Prevent reflections from the clip frame.
-
Photo Requirements
- Ensure the clip frame is correctly positioned.
- Avoid movement of the clip frame.
- Keep the face directly facing the camera (refer to measurement frame frontal shooting requirements).
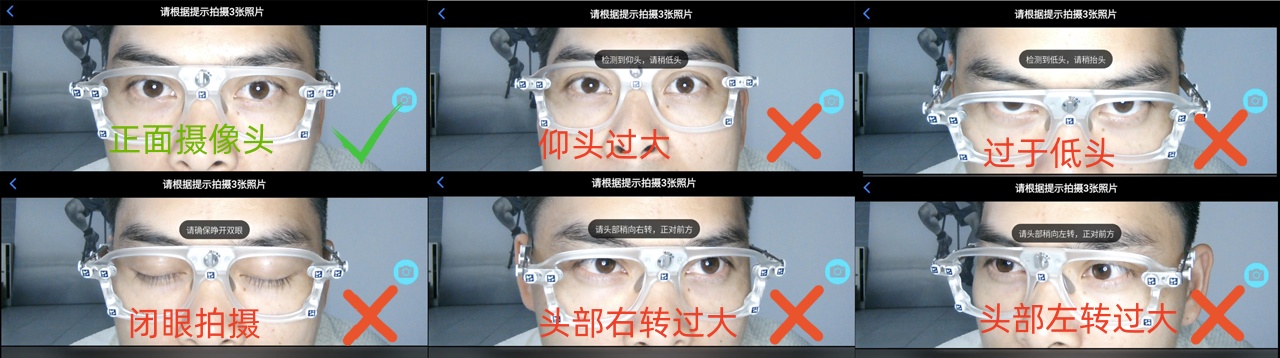
- Maintain a natural facial expression.
- Ensure the pupils are not obstructed by lens reflection circles during frontal photos.

-
Ensure the side photo is taken directly facing the camera.

-
Coordinate Calibration
- Carefully verify the automatically recognized results.
- Manually adjust coordinates if necessary.
- Ensure the bounding box aligns with the inner edges of the frame on all four sides.
-
Ensure the red line aligns with the inner edge of the lens.

-
Result Validation
- Check if the measurement results are reasonable.
- Re-measure if necessary.
- Save the measurement records.
- Verify the accuracy of the clip frame parameters.
Common Issues
- Inaccurate Measurement Results
- Check the measurement environment lighting.
- Confirm the shooting angle is correct.
- Verify the accuracy of coordinate calibration.
-
Check if the clip frame installation is centered.
-
Unable to Recognize Pupils
- Adjust lighting conditions.
- Ensure the face is directly facing the camera.
- Check for reflections from the clip frame.
-
Adjust the clip frame position.
-
Incorrect Clip Frame Parameter Calculation
- Ensure the clip frame position marking is accurate.
- Check the quality of the side photo.
- Verify the measurement frame position is correct.
- Confirm the clip frame angle.
Measurement Results
After measurement is complete, the system will generate a detailed parameter report, including: - Specific values for all measured parameters - Measurement timestamp - Customer information - Measurement result values